This plan includes
- Limited free courses access
- Play & Pause Course Videos
- Video Recorded Lectures
- Learn on Mobile/PC/Tablet
- Quizzes and Real Projects
- Lifetime Course Certificate
- Email & Chat Support
What you'll learn?
- Master all the tools available in SketchUp Free
- Mastering 3D modeling techniques from basic to advanced
- Set materials and textures, and even create your own custom materials
- Create a 3D house model from start to finish
Course Overview
In this online course, you will learn SketchUp Free or also known as SketchUp for Web. You will start from the very basic and then move up gradually to the advanced level. The curriculum is carefully crafted so you will learn SketchUp in the most effective and efficient way. In less than 7 hours, in sha Allah, you will be able to master all the available tools and use them to create a 3D house design from start to finish.
What you will learn
There are so many things you will learn in this online course. There are just too many to explain in this description text. To see the details, you can scroll down to the curriculum section. But, just for a quick summary. This online course consists of 9 chapters, apart from the introduction chapter.
In the first chapter, you will learn the interface of SketchUp Free as well as its basic features. You will learn to import 3D models from the 3D warehouse. Then learn how to do navigation, and use different types of "views". Next, you'll learn how to use the "scenes" feature. And then we will discuss how to change the appearance of the 3D models using "Styles". After that, we will discuss various commands related to files. And also learn how to create a "custom shortcut".
In the second chapter, we will discuss basic 3D modeling techniques. We'll start by learning the line tool. Then discuss the concepts and features of "inference" in SketchUp. After that, we will discuss the "Rectangle" tool. And then discuss one of the most important tools in SketchUp, called the "push-pull" tool. Also in this chapter, we will discuss various object selection techniques. And techniques for deleting objects. Finally, we will cover how to use the "offset" tool.
The third chapter is a practice chapter. First, we will model a "planter box" object. Then create a 3D model of a cabinet. After that, we will try to create a 3d model of a pet house.
In the fourth chapter, we will focus on object manipulation and object management techniques available in SketchUp Free. There are many things that we will discuss in this chapter. Some of them are, object transformation, from the basic to advanced techniques. Then, learn how to use "tags" to manage 3D objects more easily and quickly. Next, you will learn various duplication techniques. Then learn how to group objects either with the basic "group" method or with the more advanced method using "component".
In the fifth chapter, we will discuss various advanced modeling techniques. You will learn how to use "Rotated rectangle". Learn the ins and outs of the "circle" tool and the "polygon" tool. Then learn the concepts and techniques of smoothing 3D object surfaces. Then, you will learn how to use the "Freehand" tool as well as the "Arc" tool. And then create 3D text objects. And finally, learn to use the "follow me" tool.
The sixth chapter is a special chapter for 3D modeling exercises. We will make use of the advanced techniques discussed earlier. We will start by modeling a coffee table. Then learn to model a classic gate. Then learn how to model a "square pillar". Next, we will discuss the techniques for creating a double-sided door. Starting by making the door frame, then the door leaf. And finally, we'll create the doorknob. Next, you will learn how to model a book. The last project in chapter six is creating a stair and its railing. You will learn a simple yet effective method for defining the stair steps without doing complex calculations manually.
The seventh chapter focuses on discussing measurement and annotation techniques. Here you will learn the "Tape measure" tool, and then also the "protractor" tool. Next, you will learn different methods for assigning labels such as for dimensions or simply for adding comments. Then, we'll cover how to create cutouts of our 3D model using the "section plane". And finally, you will learn how to create "custom axes".
In chapter eight, you will learn to use materials and textures. In addition to learning to use the materials provided by SketchUp, you will also learn to create your own materials and textures. After that, we will discuss various methods of manipulation for textures that are already attached to 3d object surfaces. We will cover both flat surfaces and also curved surfaces.
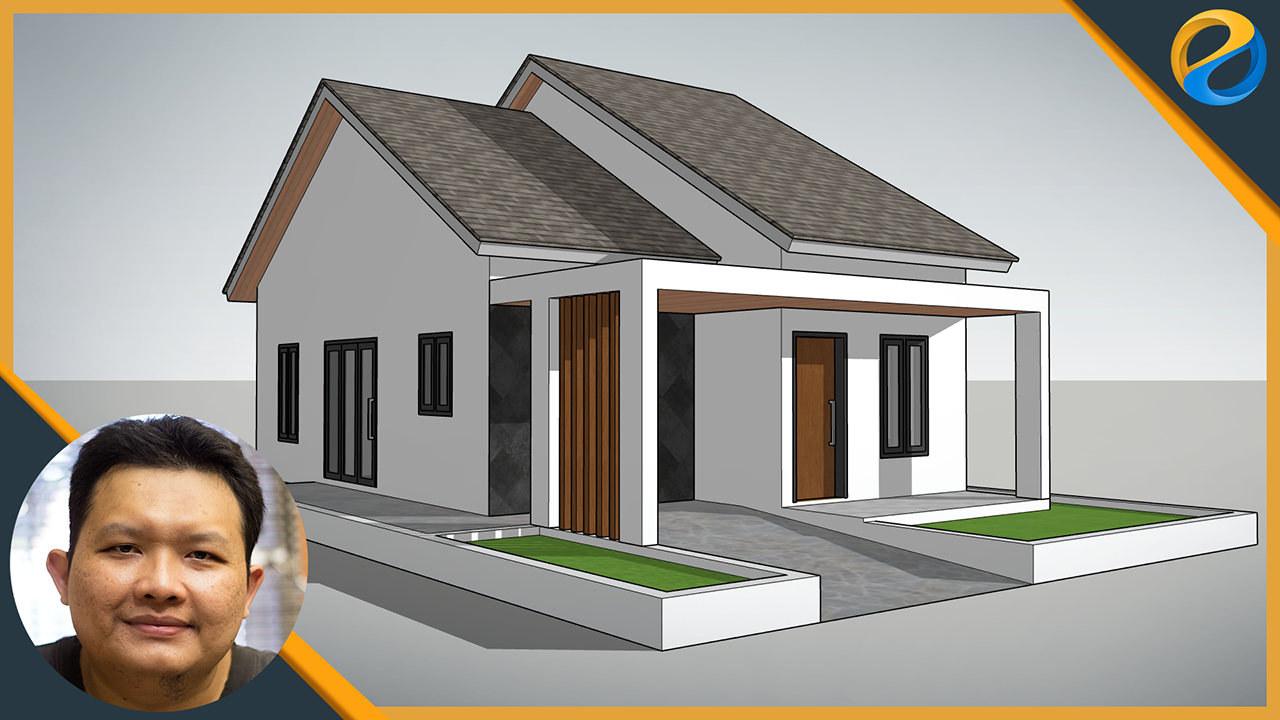
In the last chapter, or chapter nine. We will create the final project which is a house. We'll start by importing the reference image. Then model the walls. Add windows and doors. Then create the floor, the surrounding area, and also the carport. We will create the roof which will be a double-stacking type. Then make a large canopy that covers the terrace and carport area. Finally, we'll add ornaments for the house facade. In sha Allah, you will be able to create a house 3D model from start to finish if you follow this course from start to finish.
So, join this online course now! and improve your skill in the Architectural field.
Pre-requisites
- PC or Mac computer with at least 4GB RAM
- Internet connection
- Standard mouse with scroll-wheel
Target Audience
- Beginners who have never used 3D software before
- Students in the field of architecture or civil engineering
- Professional workers in the field of design and build
- Computer Graphics hobbyist
- Game level designers
- 3D concept artists
Curriculum 69 Lectures 06:53:30
Section 1 : Introduction
- Lecture 2 :
- Information and Disclaimer
- Lecture 3 :
- Starting SketchUp Free
- Lecture 4 :
- Exercise files
Section 2 : User Interface basics
- Lecture 1 :
- UI basics
- Lecture 2 :
- Importing from 3D warehouse
- Lecture 3 :
- Navigation
- Lecture 4 :
- Standard views and FOV
- Lecture 5 :
- Scenes
- Lecture 6 :
- Viewport effects
- Lecture 7 :
- Model info
- Lecture 8 :
- Working with files
- Lecture 9 :
- X-Ray and custom shortcut
Section 3 : 3D modeling basics
- Lecture 1 :
- Line tool basics
- Lecture 2 :
- Inference locking
- Lecture 3 :
- Rectangle tool
- Lecture 4 :
- Push-pull tool
- Lecture 5 :
- Selection basics
- Lecture 6 :
- Erasing techniques
- Lecture 7 :
- Offset tool
Section 4 : Basic modeling projects
- Lecture 1 :
- Project: Planter box
- Lecture 2 :
- Project: Simple cabinet
- Lecture 3 :
- Project: Pet house
Section 5 : Object manipulation and management
- Lecture 1 :
- Transformation basics
- Lecture 2 :
- Advanced transformation
- Lecture 3 :
- Working with Tags
- Lecture 4 :
- Advanced element selection
- Lecture 5 :
- Duplication
- Lecture 6 :
- Group basics
- Lecture 7 :
- Group advanced features
- Lecture 8 :
- Component basics
- Lecture 9 :
- Component advanced features
- Lecture 10 :
- Hiding objects
Section 6 : Advanced 3D modeling
- Lecture 1 :
- Rotated Rectangle
- Lecture 2 :
- Circle and Polygon
- Lecture 3 :
- Softening and Smoothing surfaces
- Lecture 4 :
- Freehand and Arc
- Lecture 5 :
- Welding and Dividing edges
- Lecture 6 :
- 3D text
- Lecture 7 :
- Follow Me tool
Section 7 : Advanced modeling projects
- Lecture 1 :
- Project: Coffee table
- Lecture 2 :
- Project: Classic gate
- Lecture 3 :
- Project: Square pillar
- Lecture 4 :
- Project: Two-sided door - Part 1
- Lecture 5 :
- Project: Two-sided door - Part 2
- Lecture 6 :
- Project: Book
- Lecture 7 :
- Project: Stair - Part 1
- Lecture 8 :
- Project: Stair - Part 2
Section 8 : Measuring and labeling
- Lecture 1 :
- Tape Measure
- Lecture 2 :
- Protractor
- Lecture 3 :
- Dimensions and Text
- Lecture 4 :
- Section plane
- Lecture 5 :
- Multi-sections presentation
- Lecture 6 :
- Custom axis
Section 9 : Material and texture
- Lecture 1 :
- Material basics
- Lecture 2 :
- Advanced material
- Lecture 3 :
- Creating custom materials
- Lecture 4 :
- Texture transformation and projection
- Lecture 5 :
- Texturing curved surfaces
Section 10 : House final project
- Lecture 1 :
- Importing reference image
- Lecture 2 :
- Creating the wall
- Lecture 3 :
- Adding wall openings
- Lecture 4 :
- Cleaning up the model
- Lecture 5 :
- Creating the windows
- Lecture 6 :
- Window duplication and modification
- Lecture 7 :
- The doors
- Lecture 8 :
- Floor, environment, and carport
- Lecture 9 :
- Modeling the roofs
- Lecture 10 :
- The canopy and Facade
Our learners work at
Frequently Asked Questions
How do i access the course after purchase?
It's simple. When you sign up, you'll immediately have unlimited viewing of thousands of expert courses, paths to guide your learning, tools to measure your skills and hands-on resources like exercise files. There’s no limit on what you can learn and you can cancel at any time.Are these video based online self-learning courses?
Yes. All of the courses comes with online video based lectures created by certified instructors. Instructors have crafted these courses with a blend of high quality interactive videos, lectures, quizzes & real world projects to give you an indepth knowledge about the topic.Can i play & pause the course as per my convenience?
Yes absolutely & thats one of the advantage of self-paced courses. You can anytime pause or resume the course & come back & forth from one lecture to another lecture, play the videos mulitple times & so on.How do i contact the instructor for any doubts or questions?
Most of these courses have general questions & answers already covered within the course lectures. However, if you need any further help from the instructor, you can use the inbuilt Chat with Instructor option to send a message to an instructor & they will reply you within 24 hours. You can ask as many questions as you want.Do i need a pc to access the course or can i do it on mobile & tablet as well?
Brilliant question? Isn't it? You can access the courses on any device like PC, Mobile, Tablet & even on a smart tv. For mobile & a tablet you can download the Learnfly android or an iOS app. If mobile app is not available in your country, you can access the course directly by visting our website, its fully mobile friendly.Do i get any certificate for the courses?
Yes. Once you complete any course on our platform along with provided assessments by the instructor, you will be eligble to get certificate of course completion.
For how long can i access my course on the platform?
You require an active subscription to access courses on our platform. If your subscription is active, you can access any course on our platform with no restrictions.Is there any free trial?
Currently, we do not offer any free trial.Can i cancel anytime?
Yes, you can cancel your subscription at any time. Your subscription will auto-renew until you cancel, but why would you want to?
Instructor

8680 Course Views
7 Courses


 Tech & IT
 Business
 Coding & Developer
 Finance & Accounting
 Academics
 Office Applications
 Art & Design
 Marketing
 Health & Wellness
 Sounds & Music
 Lifestyle
 Photography
